The Restless Cabal
Guida in italiano QUA
Cliccate su Leggi Tutto per la guida testuale in inglese!
The Restless Cabal is the first boss in Crucible of Storms. After defeating The Restless Cabal, players will head to the final boss of the raid, Uu'nat.
Loot
Quick Tips
General
-
Tanks, taunt Fa'thuul the Feared off of one another when your
 Shear Mind stacks drop.
 -
A single ranged DPS needs to tank Zaxasj the Speaker by using the
 Aphotic Blast!
 -
Avoid standing within the
 Void Crash zones during periods of high incoming raid damage.
 -
Have a single player stand within a Void Crash zone to soak it, preventing it from bouncing around further.
-
Move away from the raid to reduce the damage you deal to them when
 Crushing Doubt expires.
 -
Do not stand near the player targeted by the Aphotic Blast
-
Move out of the
 Cerebral Assault cone.
 -
Do not attack players who are "hostile to allies" - they are not mind controlled!
-
Gain
 Promises of Power by standing near the
  Dark Herald afflicted player. Make sure not to have high stacks when incoming damage happens!
 -
Let through the
 Witness the End casts in a staggered fashion by interrupting the Eldritch Abomination adds.
 -
Keep damaging the
 Visage from Beyond to prevent it from casting
  Terrifying Echo.
Relics
-
Void Stone - Quickly damage through and remove the
 Umbral Shell to allow the raid to receive healing once again.
 -
Trident of Deep Ocean - Stack enemies within the shield and damage them to destroy the shield.
-
Tempest Caller - Keep everyone above 25% health to prevent them from being hit by Annihilation.
The Restless Cabal Abilities & Strategy
The encounter takes place on a large platform surrounded by water.
-
Players leaving the platform will be afflicted with
 Enveloping Darkness which deals heavy ticking damage and applies a 99% damage and healing done reduction for 30 seconds.
 -
At no point in the encounter should players leave the platform and gain this debuff.
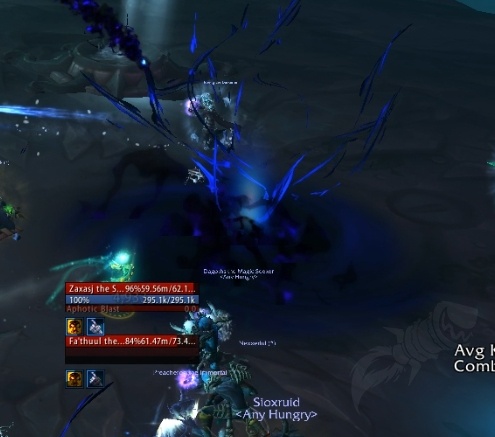
The raid will combating two bosses at all times, Zaxasj the Speaker and Fa'thuul the Feared.
-
These bosses do not share a health pool and when a boss reaches 1 hp they will cast
 Pact of the Restless.
 -
This cast prevents the bosses death and will heal them to 20% hp upon completion. The spell is interrupted when both bosses are bought to 1 hp.
-
This forces the raid to get both bosses to the 1 hp mark within the 20 second cast time of the Pact of the Restless, as otherwise the heal will likely cause the raid to fall far behind and wipe.
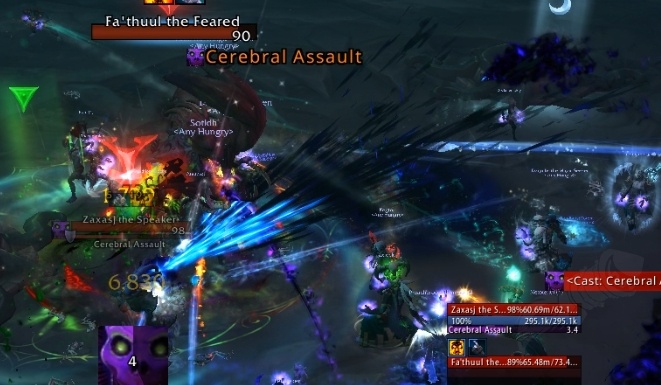
Fa'thuul the Feared
Shear Mind
Fa'thuul the Feared will frequently cast ![]() Shear Mind on the tank, dealing a large burst of physical damage and applying a debuff which reduces all stats by 10% for 20 seconds.
Shear Mind on the tank, dealing a large burst of physical damage and applying a debuff which reduces all stats by 10% for 20 seconds.
-
Tanks should taunt off of one another each time their Shear Mind stacks drop, which is usually around the 3-4 stack mark.
-
Both tanks should focus their efforts into positioning and maintaining threat on Fa'thuul the Feared, as Zaxasj the Speaker is tanked and dealt with by a ranged DPS.
Void Crash
Throughout the encounter, Fa'thuul will mark an area of the encounter space with ![]() Void Crash.
Void Crash.
-
After a few moments this area will explode, dealing damage to all players within 10 yards.
-
If no players are hit, a new smaller area will be marked and the ability will repeat. This size reduction also reduces the damage the Void Crash deals.
-
The Void Crash will "bounce" like this and reduce in size twice, at which point it will bounce around until the ability eventually hits somebody.
-
Players need to actively avoid getting hit by the Void Crash until it has reduced to its smallest size.
-
When raid damage is low, a single player should stand within the Void Crash as to remove it, which will increase raid damage as casters are able to stand still for longer periods of time.
Crushing Doubt
Two players will be marked with ![]() Crushing Doubt.
Crushing Doubt.
-
This 12 second debuff slows movement speeds by 25% and deals ever increasing damage every 2 seconds.
-
Upon expiration, the debuff explodes, dealing raid wide damage which is reduced the further players are from the debuff.
-
Players afflicted with Crushing Doubt should move away from the raid and towards the sides of the encounter space, whilst the majority of the raid spreads loosely around the middle.
-
They must make sure that they do not run near the player who is tanking Zaxasj the Speaker at the time, as they also may be near the edges of the encounter space.

Zaxasj the Speaker
Aphotic Blast
Instead of melee hitting, Zaxasj the Speaker will frequently cast ![]() Aphotic Blast.
Aphotic Blast.
-
This deals a burst of shadow damage to the target and anyone within 5 yards. This damage is reduced the further the target is from Zaxasj the Speaker.
-
The bolt also applies a debuff which increases threat generation by 150% for 30 seconds. This debuff is refreshed each time the Aphotic Blast hits the player.
As to reduce the damage taken by the ![]() Aphotic Blast, a single ranged DPS with strong single target damage should tank Zaxasj the Speaker throughout the encounter.
Aphotic Blast, a single ranged DPS with strong single target damage should tank Zaxasj the Speaker throughout the encounter.
-
All players should avoid dealing damage the Zaxasj the Speaker at the beginning of the encounter, as to allow this ranged DPS tank to get some initial threat.
-
Once the player has sufficient threat on the boss (usually around 10 seconds into the encounter), players should feel free to deal damage to this boss.
-
Tanks should avoid ripping threat from Zaxasj the Speaker at all times, as the Aphotic Blast threat generation debuff will make it difficult for the ranged player to rip threat back off of them.
As the ![]() Aphotic Blast has a 30 yard range, the ranged DPS tank may need to move far from the raid as to force Zaxasj the Speaker into moving around.
Aphotic Blast has a 30 yard range, the ranged DPS tank may need to move far from the raid as to force Zaxasj the Speaker into moving around.
-
A healer must be prepared to cover this ranged tank during this time, as the ranged tank will likely move far out of range of the raid.
-
Once Zaxasj the Speaker is in the desired position, the ranged tank should attempt to move slightly closer to the raid, as to allow the healer to maintain range on them without a large amount of disruption to their positioning.
-
That being said, the ranged DPS tank should always avoid standing within 5 yards of any other player, as to prevent the Aphotic Blast debuff from splashing onto anyone else.
Cerebral Assault
Zaxasj the Speaker faces the direction of a random player and casts ![]() Cerebral Assault, creating a cone in the direction of the player.
Cerebral Assault, creating a cone in the direction of the player.
-
After the 6 second cast, all players within the cone will take a moderate burst of shadow damage and become hostile to allies for 4 seconds.
-
All players should side step out of this cone, which is easily done as long as they are paying attention.
Players who are "hostile to allies" are not mind controlled, they have full control over their character.
-
Players who are "hostile to allies" can attack other players with their spells as well as be attacked by other players. Healers are also unable to heal them whilst the debuff holds.
-
Players who are accidentally hit by this should be left alone. Do not throw out damaging spells or crowd control their way, instead just leave them and wait for the debuff to expire.
Dark Herald
A single non-tank player will occasionally be afflicted with ![]() Dark Herald.
Dark Herald.
-
This 10 second debuff will apply Promises of Power debuffs to all players within 5 yards every 5 seconds.
-
Promises of Power is a magic debuff with an endless duration. It increases the damage you deal by 10% whilst reducing your maximum health by 10%.
-
This debuff increases passively over time, eventually capping out at 9 stacks (reducing health by 90% and increasing damage by 90%).
-
This debuff can be dispelled at any time. However on heroic, dispelling the debuff will deal damage to the dispeller.
The raid needs to be very careful with the ![]() Dark Herald ability.
Dark Herald ability.
-
Although the damage bonus is very powerful, the reduction to the players health pool could lead to them being one shot by unavoidable mechanics, such as the Crushing Doubt debuffs.
-
The raid needs to be prepared to remove all Promises of Power debuffs before these damage sources come in, as to ensure nobody is one shot.
-
When the Promises of Power debuff is dispelled, the players will maintain the same health percentage (If you have 90% health and then the debuff is dispelled, you will still have 90% health).
The raid may want to have a few designated DPS take the ![]() Promises of Power debuff each time
Promises of Power debuff each time ![]() Dark Herald is applied.
Dark Herald is applied.
-
These few DPS can use the large damage increase to great effect, before having it removed before an unavoidable damage source comes in.
-
By limiting the amount of players who receive the Promises of Power debuffs, it helps healers ensure that all players are dispelled at the correct time.
-
Groups with priests may wish to increase the amount of people who take the damage buff, as they are able to use Mass Dispels to remove the debuff off of multiple players at once.
-
Tanks, the ranged DPS tank and healers should avoid gaining this buff, as the health reduction is likely to cause more problems than the damage buff is worth.
Relics of Power
Whenever either boss reaches 75, 50 and 25% health, they will activate the Relic of Power they are closest too.
-
There are three relics in the encounter space. Each relic has a powerful effect when activated that the raid will need to counter.
-
The raid gets to choose the order in which the relics are activated, simply by positioning the bosses closest to the relic they wish to activate next.
-
Each relic should only be used by each boss once, because if an individual boss uses a particular relic more than once they will gain a 300% damage increase buff:
 Power Overwhelming.
 -
When a boss activates a Relic for the first time, they will gain a permanent 10% damage buff. These buffs stack up, meaning that the boss will be dealing 30% extra damage after activating all three relics.
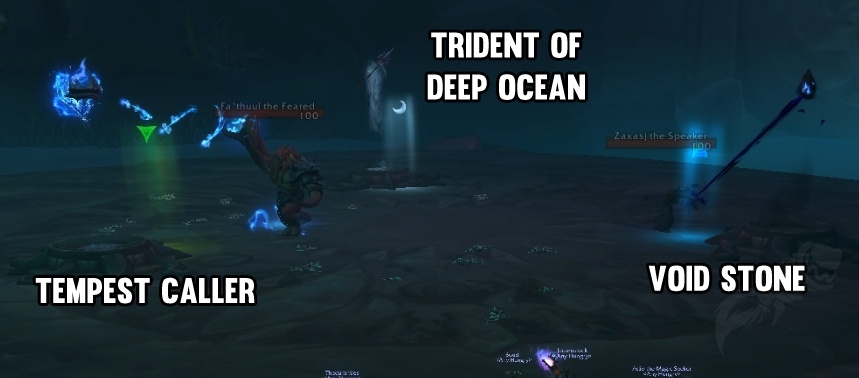
Void Stone
Upon activation, the Void Stone applies and ![]() Umbral Shell buff to the boss who activated it.
Umbral Shell buff to the boss who activated it.
-
This is a large damage absorption shield which reduces the healing all raid members receive by 100% whilst it holds via
 Embrace of the Void.
 -
DPS must focus their damage into the boss with Umbral Shell as to allow the raid to receive healing once again.
-
Healers should ensure that all players are healthy before the Umbral Shell activates, whilst tanks use defensive cooldowns to survive during this time.
-
If the raid is struggling to remove the Umbral Shell within a reasonable time, the group might want to use the Promises of Power debuffs to increase their outgoing damage.
Trident of Deep Ocean
Upon activation, the Trident of Deep Ocean will create a large ![]() Custody of the Deep shield around itself.
Custody of the Deep shield around itself.
-
This shield has a health pool which can be seen in the boss frames. Any enemy within the shield will have 75% of the damage they take redirected to the shield.
-
The shield will explode after 20 seconds, dealing damage equal to its remaining health to all players in the raid via
 Abyssal Collapse. If the shield is destroyed before this time, it will dissipate harmlessly.
 -
Tanks should position as many enemies underneath the shield as possible, as to increase the amount of damage the shield will take.
-
Just like the Void Stone, the raid may want to utilise the Promises of Power debuffs to help damage through the shield if they are unable to destroy the shield before it explodes.
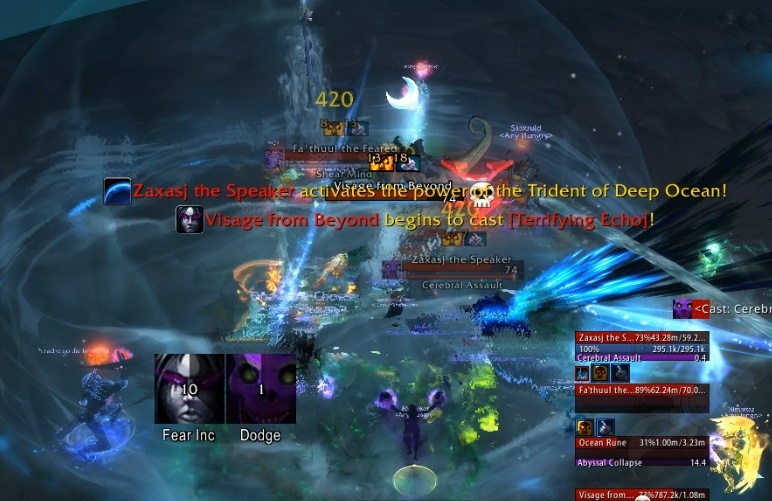
Damage enemies within the shield to destroy it before it explodes!
Tempest Caller
Upon activation, the Tempest Caller will pulse out damage to the raid every second over 15 seconds.
-
This
 Storm of Annihilation damage reduces the damage players deal by 50% for 3 seconds and will instantly kill any player who is lower than 25% health when it deals damage to them via
  Annihilate.
 -
All players should remove their Promises of Power debuffs before activating the Tempest Caller relic.
-
This is the most healing intensive part of the encounter, so healers should be prepared to cover this incoming damage with cooldowns.
-
Players may also want to use their own personal damage reduction cooldowns to ensure they do not drop below 25% health.
-
Groups with confident healers may wish to activate two Tempest Caller relics back to back at the beginning of the fight, as the bosses will not have any damage increasing buffs at this point and the damage is manageable if healers coordinate their cooldowns correctly.
-
That being said, raids with less powerful healers or PUGs may wish to avoid activating the Tempest Caller relics back to back, as they may be unable to out-heal the damage.
Activation Order
As this fight is still relatively new, there is no widely known "best order" to activate the relics in.
-
As long as the group never has a boss activate the same relic twice, and as long as the bosses do not activate relics at the same time, the relics can be done in pretty much any order.
-
That being said, a decent order for your group to start out with can be found below, as this one ensures that the bosses stay close together for cleave, whilst also keeping the two Tempest Caller activations far apart to allow for healing cooldowns to be ready once again.
-
Organised raid groups with confident healers may wish to have both Tempest Callers relics triggered at the beginning of the encounter as to keep the damage they deal to a minimum.
| Relic 1 | Relic 2 | Relic 3 | Relic 4 | Relic 5 | Relic 6 | |
| Fa'thuul the Feared | Tempest Caller | Void Stone | Trident of Deep Ocean | |||
| Zaxasj the Speaker | Void Stone | Trident of Deep Ocean | Tempest Caller |
If a perfect activation order is ever found, this section of the guide will be updated with that information!
 Eldritch Revelation and Visage from Beyond
Whenever a boss activates a Relic of Power, they will cast one unique spell.
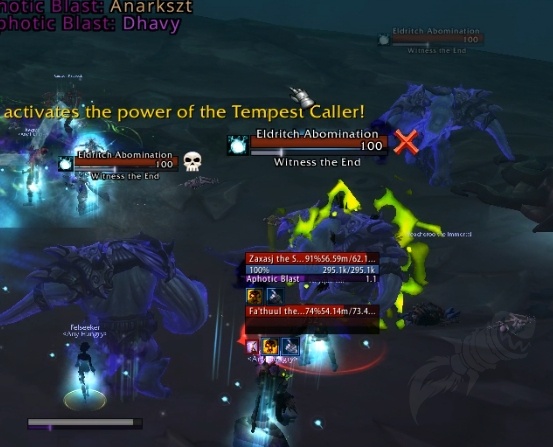
Fa'thuul the Feared will cast ![]() Eldritch Revelation, which summons three Eldritch Abomination adds.
Eldritch Revelation, which summons three Eldritch Abomination adds.
-
Each add will cast Witness the End, a 9 second cast which will cause the add to die and deal moderate shadow damage to the raid.
-
Although the raid could survive three Witness the End explosions at once in theory, it is likely to kill off a player or two.
-
The Eldritch Abomination adds should be interrupted in such a way as to let the Witness the End casts through in a staggered way.
-
This should be done by having one add not be interrupted at all, the next add should be interrupted once, and the last add should be interrupted twice.
-
This will stagger the Witness the End casts 8-9 seconds apart, allowing healers to top up the raid between each hit.
-
During the Storm of Annihilation, the raid may wish to interrupt all adds until the spell has ended, as the Witness the End might drop players below 25% health.
-
-
These adds do not need to be tanked and have a huge health pool, making killing them with direct attacks a nonviable strategy.
Zaxasj the Speaker will cast ![]() Visage from Beyond, which summons a single add of the same name.
Visage from Beyond, which summons a single add of the same name.
-
This add casts Terrifying Echo, which will deal a burst of damage and fear all players for 6 seconds if the 15 second long cast goes through.
-
The only way the cast can be interrupted is by bring the add to 1 hp.
-
Once at 1 hp, the add will regenerate health at an ever increasing rate via
 Coalesce Void.
 -
Once it reaches 100% health, it will begin to cast Terrifying Echo once again. The add will despawn after 1 minute.
The raid should focus down the add as soon as possible, as to ensure the ![]() Terrifying Echo cast never goes off.
Terrifying Echo cast never goes off.
-
As the add cannot be moved in any way, the raid will need to return to this add each time it reaches 100% health.
-
The add can take damage whilst regenerating, so players who can passively cleave/multi-dot the add should do so as to keep the add regenerating for longer periods of time.
Heroic Changes
Aside from numerical changes, in which the enemies have more health and deal more damage, there are a few mechanical changes to the encounter on heroic difficulty, although they do not warrant large changes in strategy.
The 30 second debuff applied via ![]() Aphotic Blast will apply a new debuff if it expires:
Aphotic Blast will apply a new debuff if it expires: ![]() Agent of Demise.
Agent of Demise.
-
This debuff permanently makes the player "hostile to allies" whilst reducing all incoming healing by 75%.
-
Gaining the
 Agent of Demise debuff is highly likely to lead to the players death, as they will not be able to be assisted by healers.
 -
This additional mechanic acts as a larger punishment if the Aphotic Blast ability is mishandled, especially if it ever hits multiple players at once.
-
As long as only one person has threat on Zaxasj the Speaker throughout the encounter, the Agent of Demise debuff will never be applied.
The player who dispels the ![]() Promises of Power debuff will take a moderate burst of magic damage via
Promises of Power debuff will take a moderate burst of magic damage via ![]() Wrack.
Wrack.
-
This prevents players from using abilities such as Mass Dispel and Revival to remove a large amount of Promises of Power debuffs at once.
-
The raid must be careful not to apply Promises of Power debuffs to too many members, as otherwise healers and priests will not be able to remove them all at the correct time without taking substantial damage themselves.
![]() Witness the End cast increases the damage taken by said cast by 100% for 6 seconds.
Witness the End cast increases the damage taken by said cast by 100% for 6 seconds.
-
If a Witness the End cast goes through whilst the raid has the debuff a previous cast has left behind, it will likely kill multiple players.
-
This additional mechanic acts as a punishment for players not interrupting the adds correctly, and this forces players to stagger the rate in which the three Eldritch Abomination adds are interrupted.
![]() Visage from Beyond adds will despawn after 1.5 minutes, up from 1 minute.
Visage from Beyond adds will despawn after 1.5 minutes, up from 1 minute.
-
This makes the raid to deal with the add for a longer period of time, potentially forcing them to kill the add an additional time to interrupt the Terrifying Echo.
-
Ranged DPS must be ready to switch to this add the minute it begins to cast again, as the damage and disruptive effect from the fear can easily cause wipes on heroic difficulty.