High Tinker Mekkatorque
Guida in italiano qua!
Cliccate su Leggi Tutto per la guida testuale in inglese!
Quick Tips
-
Side step the
 Buster Cannon ability.
 -
Create line of sight between you and all others when afflicted with
 Gigavolt Charge.
 -
Crowd control Spark Bots to keep them away from the raid.
-
Enter Spark Bots when
 Shrunken and input the correct shutdown code which only your allies can see.
 -
Tell the Spark Bot players their shutdown codes!
-
Avoid
 Signal Exploding Sheep and their
  Sheep Shrapnel shards during phase two.
 -
Tanks: Taunt off of one another to reset
 Electroshock Amplification at the 8-10 stack mark.
 -
Healers: Prepare for higher incoming raid damage during phase three, due to the bosses
 Hyperdrive passive.
High Tinker Mekkatorque Abilities & Strategy
Phase One
Phase one consists of the raid engaging High Tinker Mekkatorque whilst dealing with his Spark Bot adds that spawn throughout the phase.
 Electroshock Strikes
Mekkatorques melee attacks deal an additional burst of nature damage and each consecutive melee attack against the same target gives a stack of ![]() Electroshock Amplification to Mekkatorque.
Electroshock Amplification to Mekkatorque.
-
Electroshock Amplification increases the damage of Electroshock Strikes by 15% per stack. Electroshock Amplification will reset once Mekkatorque hits a new target.
-
Tanks need to taunt off of one another throughout the encounter to keep the Electroshock Strikes stacks under control, usually around the 8-10 stack mark.
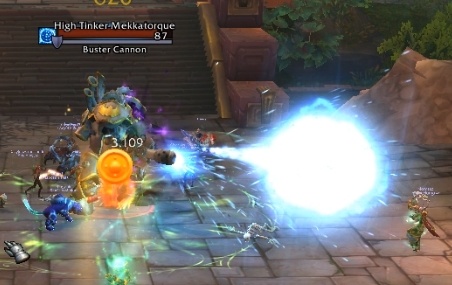
Buster Cannon
Mekkatorque faces the direction of a random player and begins to cast ![]() Buster Cannon.
Buster Cannon.
-
Upon cast completion, an energy ball will travel in that direction dealing heavy nature damage and applying a nature damage dot which reduces haste by 100% for 8 seconds.
-
Players need to quickly identify which direction Mekkatorque is facing and then side step the ability.
-
Any player hit by the ability will require some focused healing to ensure they survive the dot applied after taking the Buster Cannon shot.
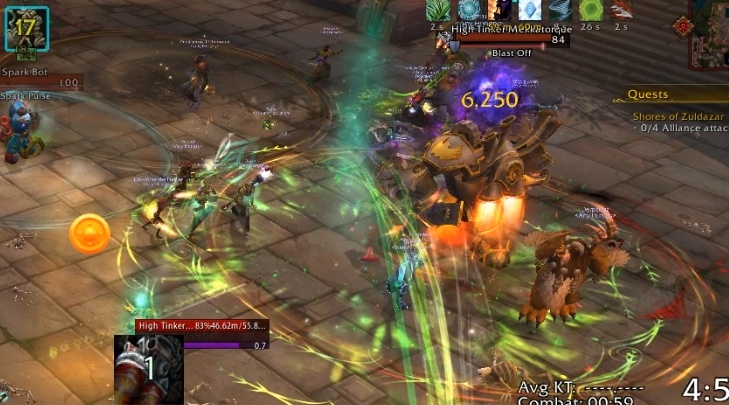
 Heavy Thrusters
Mekkatorque will infrequently cast ![]() Heavy Thrusters, marking the location of a random ranged player and creating a 10 yard zone around himself.
Heavy Thrusters, marking the location of a random ranged player and creating a 10 yard zone around himself.
-
At the end of the cast, all players within the 10 yard zone around Mekkatorque will take a high burst of fire damage via
 Blast Off.
 -
He will then leap to the marked location and trigger
 Crash Down, dealing a small burst of raid wide physical damage and dealing near lethal physical damage to anyone within the 12 yard landing zone.
 -
Players must move from both the Blast Off zone around Mekkatorque and the Crash Down landing zone, as otherwise the combined damage from the ability could kill a player.
Gigavolt Charge
Mekkatorque will apply a ![]() Gigavolt Charge debuff on 2 random players.
Gigavolt Charge debuff on 2 random players.
-
This deals low nature damage every second for 15 seconds and triggers a
 Gigavolt Blast upon expiration.
 -
Gigavolt Blast deals a moderate burst of nature damage and applies a moderate nature damage dot which lasts 30 seconds to all players who were within line of sight of the Gigavolt Charge player.
-
All Gigavolt Charge players must find separate areas to stand which generate line of sight for both the raid and the other Gigavolt Charge players.
The best three locations for the ![]() Gigavolt Charges to stand is the three ruins round in the north-east, south-east and south-western areas of the encounter space.
Gigavolt Charges to stand is the three ruins round in the north-east, south-east and south-western areas of the encounter space.
-
If the players go to each of those separate locations whilst the rest of the raid stands within the middle of the room, no additional players will be hit by a Gigavolt Blast.
-
To help assign which player should go to which location, boss mod addons can be setup to mark each debuff with a raid icon.
-
The three safe spots can be marked with the same icons. When the debuffs are applied, the players simply move to the area which corresponds to their icon.

 World Enlarger

Shutdown codes will appear above the
Spark Bot, but you cannot see your own code!
After summoning three Spark Bots, Mekkatorque will cast ![]() World Enlarger. This will apply the
World Enlarger. This will apply the ![]() Shrunk debuff to up to three non-tank players within the raid.
Shrunk debuff to up to three non-tank players within the raid.
-
Full sized players must be very cautious with their movement as to ensure they do not stomp all over their tiny comrades.
-
Players will remain Shrunk for 20 seconds and will be able to enter the Spark Bot adds to disable them.
-
This add will wander towards a random player whilst constantly casting
 Spark Pulse which deals high nature damage and stuns any player within 8 yards for 1.5 seconds.
 -
Spark Pulse also deals a small amount of nature damage to a few randomly selected raid members. This aspect of the damage is unavoidable.
-
The Spark Bots have the
 Gnomish Force Shield buff which reduces all damage taken by 99%, practically making them invulnerable.
Spark Bots are susceptible to most forms of crowd control, including slows, displacements and roots.
-
These should be used to keep the adds away from the middle of the encounter space where the raid is roughly stacked.
-
Ideally the Spark Bots will be kept close to one another, to allow the players who enter them to have line of sight of one another.
Spark Bots can be entered by a ![]() Shrunk player by having said player interact with them. This will replace the players action bars with a Vehicle UI bar which has 5 different coloured buttons.
Shrunk player by having said player interact with them. This will replace the players action bars with a Vehicle UI bar which has 5 different coloured buttons.
-
Red Spanner
-
Purple Chicken
-
Green Spring
-
Yellow Nail
-
Blue Cog

The player must use these buttons to insert a 3 part shutdown code. After 3 buttons have been hit in the correct order, the robot will shutdown and die - ejecting the player safely.
-
If the player enters the shutdown code incorrectly at any point, they will be immediately removed from the robot and receive the hard hitting
 Anti-Tampering Shock debuff.
 -
The shutdown code is displayed directly above the Spark Bot, one icon at a time. However, the player inside the Spark Bot cannot see their own shutdown code, but all other players can.
-
The players outside of the Spark Bot must communicate to each player inside what their code is. This must be done within 60 seconds, or the player will be ejected with an Anti-Tampering Shock debuff.
-
Spark Bots will not move around whilst players are inside them.
Three Spark Bots will be active each time the ![]() World Enlarger is cast, meaning that three Spark Bots will need to be deactivated within the 60 second time period.
World Enlarger is cast, meaning that three Spark Bots will need to be deactivated within the 60 second time period.
-
We recommend that each Spark Bot is marked with a raid icon as to help differentiate between the three.
-
Once the players have entered their adds, a single player outside of the Spark Bots can tell each player what their colour is.
-
As an example, if one add has the Skull icon, one the X icon, and the other has the Moon icon, the player calling out can say "Skull press red, X press green, Moon press yellow"
-
After doing this three times, the players can press any button to be ejected and the task will be complete.
-
Alternatively, the three Spark Bot players can simply tell each other what their shutdown code is.
-
This entire task is going to be far easier if all players are on voice chat with one another, unless an addon can trivialize the mechanic entirely.
As three Spark Robots will be active when ![]() World Enlarger is cast, all three
World Enlarger is cast, all three ![]() Shrunk players must get in a Spark Bot.
Shrunk players must get in a Spark Bot.
Once Mekkatorque has been damaged down to 40% health, he will fly up into the sky and phase two will begin.
Phase Two
During phase two, Mekkatorque cannot take damage. Players need to dodge the bosses mechanics for a 1:05 minutes before Mekkatorque decides to land again and phase three will begin.
Mekkatorque will continue to cast ![]() Gigavolt Charge and
Gigavolt Charge and ![]() World Enlarger.
World Enlarger.
-
These mechanics must be dealt with in the same way as before, by having people line of sight with the Gigavolt Charge and by having people avoid the Shrunken players. However, many more people will be Shrunk
-
If you have any remaining Spark Bots in this phase, the Shrunk players should continue to shut them down as often as possible, using the same method as described for phase one.
Mekkatorque has one new ability: ![]() Signal Exploding Sheep.
Signal Exploding Sheep.
-
This will call down a herd Exploding Sheep which cover the majority of the encounter space.
-
These sheep will then begin to cast
 Critter Explosion, which deals a lethal burst of fire damage to anyone within 8 yards and fires off several Sheep Shrapnel shards in multiple directions.
 -
Players must move away from the Critter Explosion and be ready to dodge the large amount of Sheep Shrapnel, which deals a large burst of fire damage whilst knocking back and applying a 10 second dot to anyone hit.
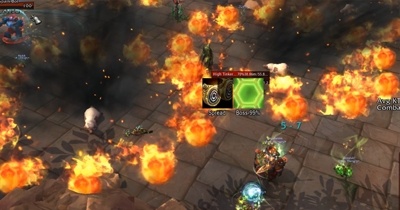
Dodge the exploding sheep!
Phase three will begin once Mekkatorque lands with a Crash Down cast, dealing lethal damage to anyone within his landing zone and moderate raid wide damage.
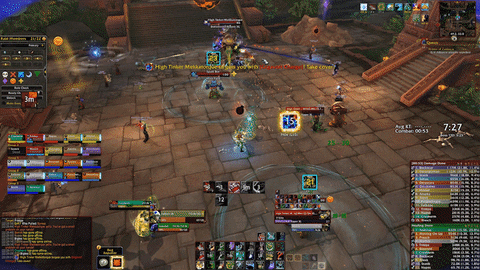
Phase Three
This phase is identical to phase one aside from the fact that Mekkatorque will continue to cast ![]() Signal Exploding Sheep and has gained the
Signal Exploding Sheep and has gained the ![]() Hyperdrive passive.
Hyperdrive passive.
-
This increases his attack speed by 30% and causes him to deal small bursts of nature damage to random players periodically via his Hyperdrive Discharge.
-
Tanks will need to taunt off of one another more frequently, as the Electroshock Amplification stacks will be applying 30% faster.
-
Healers need to be prepared to deal with the larger amount of incoming raid damage due to the Hyperdrive Discharge and attack speed increase.
-
Cooldowns should be staggered throughout the phase to keep the raid healthy.
-
The raid should continue to disable the Spark Bot adds throughout the phase to keep the encounter space clean and under control.
-
Spark Bots will occasionally spawn in pairs, leaving the raid with more Spark Bots to disable than players shrunk. These extra bots should be crowd controlled away from the raid.
Heroic Difficulty
Gigavolt Charge
On Heroic difficulty, three players will now get the ![]() Gigavolt Charge debuff. Each player should make sure to hide behind a different piece of rubble.
Gigavolt Charge debuff. Each player should make sure to hide behind a different piece of rubble.
Spark Bot
On Heroic difficulty, shutdown codes are only visible to players inside other Spark Bots.
-
This forces the three players controlling the Spark Bots to communicate with one another without the help from other raid members.
-
The three Spark Bots should be crowd controlled close to one another as to allow each player to easily see one another.
-
Additionally, players only have 45 seconds to enter the shutdown code correctly, down from 60 seconds, so get a move on!
Spark Bots will periodically gain a stack of ![]() Wind Up, which increases the adds movement speed and haste by 20%.
Wind Up, which increases the adds movement speed and haste by 20%.
-
Upon reaching 5 stacks, the add gains the
 Wound Up buff, reducing the duration of crowd control effects.
 -
If a add does gain Wound Up, players will need to apply crowd control to them more often.
 Wormhole Generator
Mekkatorque has gained the ![]() Wormhole Generator ability.
Wormhole Generator ability.
-
This will mark a random player for 5 seconds. At the end of these 5 seconds, all players within the raid will teleport to the location around that player.
-
The player marked by this spell should attempt to stand in the middle of the encounter space, as minimize the disruption caused by this mass teleport.
-
This ability can occur whilst players are afflicted with Gigavolt Charge.
-
Those players need to be quick to move to their assigned rubble pile as to ensure they create line of sight between themselves and the raid.
![]() Wormhole Generator will be cast exactly once during phase two.
Wormhole Generator will be cast exactly once during phase two.
-
The marked player must ensure that they teleport the entire raid to an area that is relatively free of exploding sheep.
-
The raid must also be very careful when moving after a teleport, as Shrunk players can easily be
 Trampled multiple times and die.
 -
It is best to let the Shrunk players move away from the raid before anyone else does.