Lady Inerva Darkvein
Guida in italiano qua!
Cliccate su Leggi Tutto per la guida completa in inglese!
Lady Inerva Darkvein Quick Tips in Castle Nathria
-
Drain the Anima Containers by clicking on them, ideally before and after the boss casts
 Focus Anima on it, as well as any time it reaches 33%+ energy when not under the Focus Anima effect.
 -
-
Tanks: taunt off of one another when you reach two stacks of
 Warped Desires.
 -
33%: Healers: spot heal players afflicted with the
 Shared Cognition.
 -
66%: Tanks: move away from the raid when Warped Desires is about to expire, as you explode with
 Change of Heart.
-
-
-
Soak the vial landing locations to avoid triggering an
 Unleashed Volatility.
 -
33%: Soaking a vial leaves
 Lingering Anima pools. Don't stand in them.
 -
66%: The vial bounces and lands for a second time. Soak twice.
-
-
-
 Shared Suffering players need to cut through each of the three orbs with their beams at the same time.
 -
33%: The orbs are connected with
 Anima Web beams. Don't stand in these beams.
 -
66%: Anima Web beams rotate around the orb. Dodge the beams.
-
-
-
Move the debuff near to the boss. Tank and kill the add that spawns from it.
-
33%: The debuffed player is rooted. Move the boss to the player instead.
-
66%: The debuffed player shoots out
 Fragments of Shadow orbs when they spawn the add. Dodge these orbs.
-
Lady Darkvein Abilities & Strategy in Castle Nathria
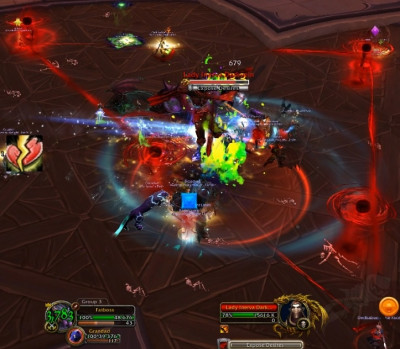
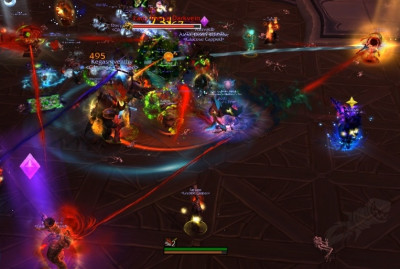
Primal Anima Containers
Lady Inerva Darkvein has four abilities that she will cast during this encounter. Each of these abilities has an Primal Anima Container linked with it.
-
These containers slowly gain energy over time. Upon reaching 33% & 66% energy, the ability linked with the container will gain an augmentation.
-
The containers can be drained by having a player interact with them. This will deplete the energy quickly, whilst dealing moderate damage to the raid whilst it is draining via
 Loose Anima.
 -
If a container is never drained and reaches 100% energy, a
 Container Breach is triggered. This deals very high shadow damage to the raid until the container is drained below 100% energy.
 -
A single player should drain a container if it ever reaches 33% energy, as to remove the augmentation the associated ability gained.
At the beginning of the fight, the boss will cast ![]() Focus Anima on the leftmost container.
Focus Anima on the leftmost container.
-
This will increase the rate it gains energy substantially, whilst also preventing players from draining it.
-
This container will remain in this state until either the boss loses 25% health, or 1:40 has passed.
-
Once either of these events occur, the boss will cast Focus Anima on the next container to its right.
-
At this moment, the previous container will stop gaining energy at an increased rate and players will be able to drain it once more.
-
The boss will repeat this until the rightmost container has Focus Anima cast on it. At this point players will have to kill her before that container reaches 100% energy.
-
Do note that the boss will continue to use all four of her abilities regardless of which Anima Container is being focused. This mechanic only affects Anima Container energy.

You can track the containers energy levels via this UI element.
Players should look to drain the container the boss is about to cast ![]() Focus Anima into next before she does so, as this will start the container at low energy, meaning the abilities will take longer to empower.
Focus Anima into next before she does so, as this will start the container at low energy, meaning the abilities will take longer to empower.
-
Once a container is no longer under the effects of Focus Anima , a player should drain it as soon as possible as this will depower the ability associated with that container.
-
Healers should be aware of when these containers are going to be drained, as they need to prepare to heal the raid during this time.
TL:DR - Drain the container before and after the boss casts ![]() Focus Anima on it, as well as any time it reaches 33%+ energy when not under the
Focus Anima on it, as well as any time it reaches 33%+ energy when not under the ![]() Focus Anima effect.
Focus Anima effect.
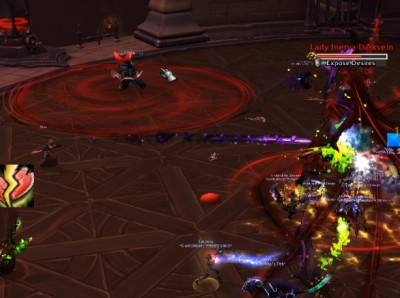
Expose Desires
The Container of Desire is linked to the ![]() Expose Desires ability and is located on the leftmost side of the room.
Expose Desires ability and is located on the leftmost side of the room.
-
This ability is frequently cast on the tank and deals a large burst of physical damage whilst applying the Warped Desires debuff.
-
Warped Desires deals moderate shadow damage over 21 seconds. This can stack.
-
To keep the Warped Desires debuff to a minimum, tanks should taunt off of each other on two stacks.
33% Empowerment: Expose Cognition
![]() Expose Desires is upgraded into
Expose Desires is upgraded into ![]() Expose Cognition when the Container of Desire reaches 33% energy.
Expose Cognition when the Container of Desire reaches 33% energy.
-
This applies a Shared Cognition debuff to a random non-tank player when a tank receives their first stack of Warped Desires .
-
Damage dealt to that tank is copied to their linked Shared Cognition partner over 10 seconds.
-
The Shared Cognition debuff is removed from the random player when the tank loses their Warped Desires stacks.
This change simply forces the healers to spot heal the player afflicted with ![]() Shared Cognition, as they will be taking heavy damage whilst it is active.
Shared Cognition, as they will be taking heavy damage whilst it is active.
-
Tanks should continue to swap on two stacks as to keep damage on themselves and their Shared Cognition partner as low as possible.
-
Players afflicted with Shared Cognition should avoid taking damage from other sources where possible, such as soaking
 Bottled Anima.
66% Empowerment: Exposed Heart
![]() Expose Desires is upgraded into
Expose Desires is upgraded into ![]() Exposed Heart when the Container of Desire reaches 66% energy.
Exposed Heart when the Container of Desire reaches 66% energy.
-
This causes the tank to trigger a Change of Heart explosion whenever their Warped Desires stacks drop.
-
Change of Heart deals moderate shadow damage to players within a short radius around the tank. The tank simply needs to move away from others to reduce incoming raid damage.
Beta Test Note: This ability is listed as having a different functionality: it is listed as dealing large damage to the raid that falls-off with distance from the tank. If this version of the ability is present, the tank should look to move as far from the raid as possible to reduce incoming raid damage.
Bottled Anima
The Container of Bottled Anima is linked to the ![]() Bottled Anima ability and is located to the right of the previously mentioned container.
Bottled Anima ability and is located to the right of the previously mentioned container.
-
Every ~35 seconds, the boss will summon multiple Bottled Anima vials that will begin to land at randomly marked locations around the encounter space.
-
Upon landing, the vial deals a moderate burst of shadow damage to all players within its 3 yard impact radius. This damage is not split between players hit.
-
If no players are hit by the impact, the vial explodes and triggers Unleashed Volatility, dealing high shadow damage to all players.
The raid needs to make sure that each ![]() Bottled Anima landing zone is soaked by a single player.
Bottled Anima landing zone is soaked by a single player.
-
To help with this, the boss should be tanked near the middle of the encounter space and ranged players should be spread loosely around her in all directions.
-
This helps make sure that no matter where the Bottled Anima decides to land, at least one nearby ranged player should be within range to run over and soak it.
33% Empowerment: Lingering Anima
![]() Bottled Anima is upgraded into
Bottled Anima is upgraded into ![]() Lingering Anima when the Container of Bottled Anima reaches 33% energy.
Lingering Anima when the Container of Bottled Anima reaches 33% energy.
-
When a vial lands on the ground, it now creates a patch of Lingering Anima which deals moderate shadow damage to anyone who remains within it.
-
Players need to be aware of these locations and try to avoid them as much as possible.
-
That being said, sometimes players may be forced to stand within a patch, such as to catch a Bottled Anima vial. When doing so make sure to use a defensive cooldown and healers will need to keep an eye on you.
-
As the location of the Bottled Anima is randomly cast, players have no control over the locations the Lingering Anima spawns in.
-
It currently appears that the Lingering Anima pools never despawn.
66% Empowerment: Replicating Anima
![]() Bottled Anima is upgraded into Replicating Anima when the Container of Bottled Anima reaches 66% energy.
Bottled Anima is upgraded into Replicating Anima when the Container of Bottled Anima reaches 66% energy.
-
When the Bottled Anima vial lands for the first time, it will bounce back up and mark another random nearby location and then land again moments later, forcing players to soak each vial twice, instead of once.
-
Healers should be quick to spot heal those who are soaking these vials as to make sure they are healthy enough to soak the second hit.
-
The direction the vial bounces towards is entirely random and cannot be controlled by players, forcing players to react quickly to their surroundings as to avoid an accidental Unleashed Volatility from triggering when the vial lands for a second time.
-
Both the first and the second landing of the Bottled Anima vial will create a patch of Lingering Anima.
 Lesser Sins and Suffering
The Container of Sin is linked to the ![]() Lesser Sins and Suffering ability and is located to the right of the previously mentioned container.
Lesser Sins and Suffering ability and is located to the right of the previously mentioned container.
-
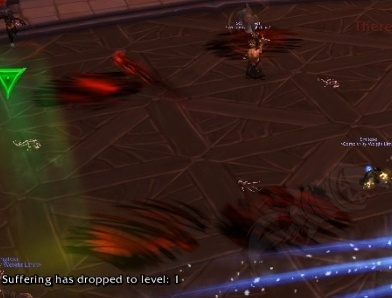
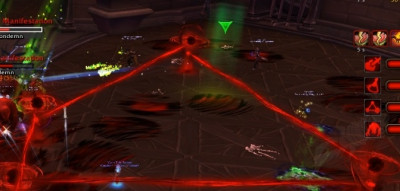
Approximately every 50 seconds, the boss will cast Lesser Sins and Suffering, spawning three
 Sins of the Past orbs around the middle of the encounter space.
 -
These orbs will deal moderate shadow damage over time to the nearest player. They will do this until they are removed or they despawn after ~45 seconds.
-
If the orbs expire after ~45 seconds, the raid receives the
 Indemnification debuff which deals very heavy shadow damage over 10 seconds to all players.
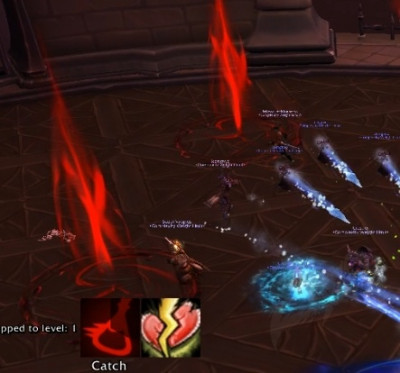
Shortly after the ![]() Sins of the Past orbs spawn, three random non-tank players will be marked with
Sins of the Past orbs spawn, three random non-tank players will be marked with ![]() Shared Suffering.
Shared Suffering.
-
Upon application, the player will be knocked back away from the boss. Each marked player will then be connected to each other via a beam.
-
This beam deals low shadow damage to any player that stands within it, so other players should attempt to move out of the path of the beams.
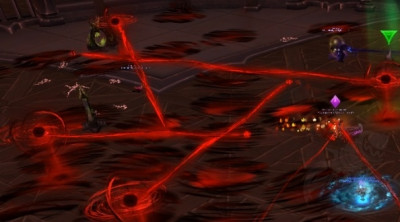
The ![]() Shared Suffering players must despawn the
Shared Suffering players must despawn the ![]() Sins of the Past orbs by passing at least one beam through each of them simultaneously.
Sins of the Past orbs by passing at least one beam through each of them simultaneously.
-
This is most easily done by having each marked player stand near a unique orb and positioning themselves so that their beam is cutting through an orb.
-
It is important that each player goes towards a separate orb, as otherwise one of the orbs is unlikely to have a beam passing through it.
-
This may take some practice, as the orbs will only despawn when all orbs have at least a single beam passing through them at the same time.
33% Empowerment: Sins and Suffering
![]() Lesser Sins and Suffering is upgraded into
Lesser Sins and Suffering is upgraded into ![]() Sins and Suffering when the Container of Sin reaches 33% energy.
Sins and Suffering when the Container of Sin reaches 33% energy.
-
This modifies the Sins of the Past orbs by linking each orb together with a single Anima Web beam.
-
Any player who is touched by this beam receives a hard hitting shadow damage 10 second dot. This dot can stack.
-
Players with Shared Suffering need to move around the outside of the orbs to avoid getting hit by the Anima Web beams.
66% Empowerment: Greater Sins and Suffering
![]() Sins and Suffering is upgraded into
Sins and Suffering is upgraded into ![]() Greater Sins and Suffering when the Container of Sin reaches 66% energy.
Greater Sins and Suffering when the Container of Sin reaches 66% energy.
-
After Anima Web beams have spawned, they will also slowly rotate on the spot.
-
The Anima Web still deals the same damage, but now has become much more difficult to avoid.
-
Players with Shared Suffering should look to remove the orbs as soon as possible whilst dodging the rotating Anima Web beams.
-
A good way of handling this is to have the Shared Suffering players stand further away from the orb they are trying to hit with their beam. As long as the angle is the same, they are still be able to cut their orb.
-
All other players should keep their distance from the Sins of the Past orbs as to avoid accidentally getting clipped by a beam.
 Lightly Concentrated Anima
The Container of Concentrated Anima is linked to the ![]() Lightly Concentrated Anima ability and is the rightmost container in the encounter space.
Lightly Concentrated Anima ability and is the rightmost container in the encounter space.
-
Lightly Concentrated Anima is cast every ~65 seconds and applies a 10 second debuff to a single player that deals moderate shadow damage over time.
-
When this debuff expires, the player will deal a low burst of shadow damage to all players within 8 yards and spawns a Harnessed Specter add.
-
The player afflicted by this debuff should move close to melee to spawn the add nearby. All other nearby players should move away to avoid taking the splash damage from the debuff expiring.
The Harnessed Specteris an immobile add that needs to be tanked.
-
It will always melee hit the player in range who has the most threat. If there is no players within melee range, it will spam cast
 Condemn which deals very high damage to the entire raid.
 -
This add will occasionally apply
 Unconscionable Guilt to the current tank, dealing a burst of shadow damage whilst leaving a debuff increasing damage done by this ability and Warped Desires by 10% for 15 seconds. This can stack.
 -
The tank not currently tanking the boss should tank this add, whilst the boss is positioned near to its location.
-
When the tanks want to taunt swap for the Warped Desires , they should also taunt swap on this add as to keep the Unconscionable Guilt stacks to a minimum.
-
The DPS should focus down this add quickly whilst cleaving damage onto the boss.
33% Empowerment: Concentrated Anima
![]() Lightly Concentrated Anima is upgraded into
Lightly Concentrated Anima is upgraded into ![]() Concentrated Anima when the Container of Concentrated Anima reaches 33% energy.
Concentrated Anima when the Container of Concentrated Anima reaches 33% energy.
-
This simply applies
 Rooted in Anima to the player who initially received the Concentrated Anima debuff for 10 seconds, preventing them from moving at all with the debuff.
 -
Players should attempt to be within a reasonably close range of the boss when the ability is about to be cast as to allow the tanks to drag the boss nearby so that the add can be quickly picked up by the tanks.
-
Spells that remove root effects, such as
 Blessing of Freedom, do not remove the Rooted in Anima snare. There is currently no known way of removing the root, aside from letting it expire.
66% Empowerment: Highly Concentrated Anima
![]() Concentrated Anima is upgraded into
Concentrated Anima is upgraded into ![]() Highly Concentrated Anima when the Container of Concentrated Anima reaches 66% energy.
Highly Concentrated Anima when the Container of Concentrated Anima reaches 66% energy.
-
This causes the player afflicted with Concentrated Anima to send out several Fragments of Shadow orbs when the debuff expires.
-
These small red orbs will slowly travel away from the player in all directions, dealing very high shadow damage to anyone in the path.
-
To make dodging these orbs easier, all other players should ensure that they are 10-15+ yards away from the debuffed player, as this will give them sufficient time to dodge any incoming orbs.
-
Tanks will also need to maintain this distance, but once they are able to see a clear path towards the add, they should quickly move towards it as to make sure that it doesn't melee hit anyone else.
Beta Test Note: In the current version of the dungeon journal, Conjured Manifestation adds are listed on normal difficulty but were not present on when this boss was tested on normal difficulty, only on heroic and mythic difficulties.

Heroic Lady Inerva Darkvein in Castle Nathria
Conjured Manifestation
When ![]() Lightly Concentrated Anima (or any of its upgraded versions) is cast, two additional debuffs will be applied.
Lightly Concentrated Anima (or any of its upgraded versions) is cast, two additional debuffs will be applied.
-
One debuff will always spawn the Harnessed Specter add, but all additional debuffs will spawn Conjured Manifestation adds.
-
Conjured Manifestation adds are immobile and do not need to be tanked. They simply spam cast Condemn, dealing very high shadow damage to the raid after a 6 second long interruptible cast.
-
When interrupted, the add will not be spell-locked and will simply begin to recast the spell.
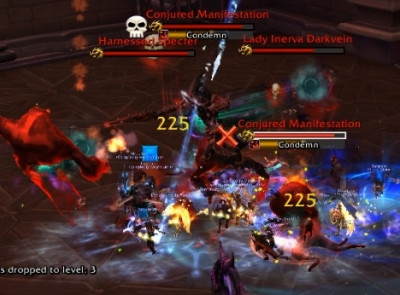
All players afflicted with the debuff should move close to the boss as to spawn the adds close together to allow for easy cleave damage between them and the boss.
-
As soon as they spawn, the adds should be marked with a raid icon and players should start interrupting each add on a rotation.
-
These rotations need to consist of 2/3 players with 14 second cooldown interrupts, or 4/5 players with 24 second cooldown interrupts.
-
The Conjured Manifestation adds should be killed as soon as possible, as doing so reducing the time that the raid has to mess up an interrupt.
When ![]() Concentrated Anima is cast and the players are rooted via the
Concentrated Anima is cast and the players are rooted via the ![]() Rooted in Anima snare, these adds will no longer be that close together.
Rooted in Anima snare, these adds will no longer be that close together.
-
Due to their immobile nature, it is impossible to gather them up once they have spawned.
-
The tanks have to move to the Harnessed Specter add, but DPS shouldn't just slam the boss and that add, as the Conjured Conjured Manifestation adds still take priority.
Mythic Lady Inerva Darkvein in Castle Nathria
Zero-Sum Game
On Mythic difficulty, whenever an anima container is drained of energy, all other closed anima containers will gain the energy drained.
-
As one anima container is locked and closed at all times due to Focus Anima , players can no longer drain any meaningful amount of anima from any containers.
-
This is because the anima drained will simply flow into the Focus Anima container, quickly filling it and likely triggering a Container Breach.
-
In practice, this means that once an ability is empowered, the raid is forced to deal with it for the rest of the encounter.
As ![]() Focus Anima is cast after the boss takes 25% health or after 100 seconds, the raid can substantially reduce the amount of energy a container gains by dealing a lot of damage to the boss.
Focus Anima is cast after the boss takes 25% health or after 100 seconds, the raid can substantially reduce the amount of energy a container gains by dealing a lot of damage to the boss.
-
This can force the boss to switch her Focus Anima container early which could skip a 66% empowerment for a large portion of the encounter.
-
Raid teams with low damage, especially at the beginning of the tier, will struggle to do this and will instead need to handle each of these empowered mechanics as they come along.
Simple Geometry
When ![]() Lesser Sins and Suffering (or any of its empowered versions) are cast, four
Lesser Sins and Suffering (or any of its empowered versions) are cast, four ![]() Sins of the Past orbs will spawn instead of three.
Sins of the Past orbs will spawn instead of three.
-
The additional orb will always spawn within close range of another orb.
-
The player who goes to that set of orbs is responsible for positioning themselves in such a way that they cut two orbs with their beam, instead of one.
-
The other two players can simply deal with this mechanic in the same way that they did on lower difficulties.