Champions of the Light 8.1 PTR
Loot
Normal Loot starts at Item level 385, Heroic Loot at 400 and Mythic Loot at 415.
Armor:
-
Cloth:
 Bracers of Zealous Calling
 -
Mail:
 Lightgrace Sabatons
 -
Plate:
 Crusade Pummelers
Azerite:
-
Cloth:
 Divine Fury Raiment
 -
Leather:
 Cowl of Righteous Resolve
Weapon
-
1H INT Dagger:
 Desecrated Blade of the Disciples
 -
2H STR Sword:
 Dawnbreaker
 -
Shield:
 Sunburst Crest
Trinket:
-
INT Healer:
 Ward of Envelopment
Quick Tips
General
-
Do not kill any adds during the
 Seal of Retribution phase, otherwise she will gain
  Zealotry stacks.
 -
Do not attack the boss during the
 Seal of Reckoning phase, otherwise she will gain Zealotry stacks.
 -
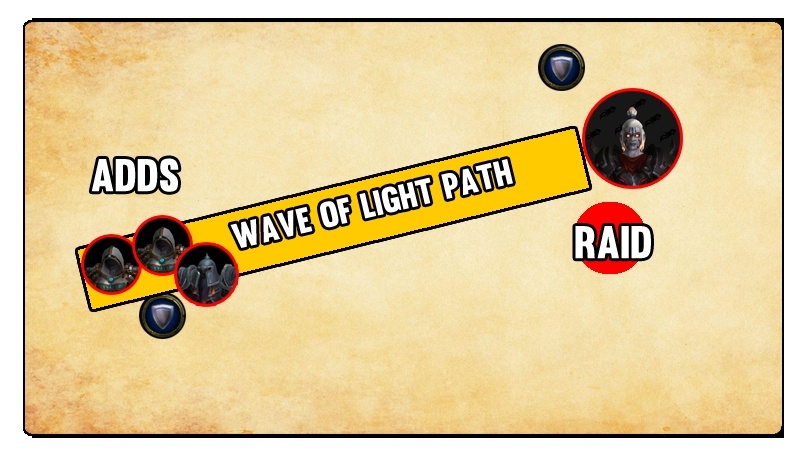
Do not stand between the boss and the adds, as the
 Wave of Light will frequently travel along this path.
 -
Do not face the Darkforged Crusader when it casts
 Blinding Faith.
 -
Use a defensive cooldown when the boss has high Zealotry stacks and/or
 Avenging Wrath and casts Judgment: Reckoning.
Tank Specific Tips
-
Keep the adds 25+ yards away from the boss in both Crusader's Seal phases.
-
Drop the
 Sacred Blade by moving from the boss during her long casts or by having the add tank taunt briefly.
 -
You can attack the boss during the Seal of Reckoning if you are afflicted with Sacred Blade.
-
Drag the adds out of the
 Consecration zones when DPS are killing them off. Otherwise just keep them stacked up in the corner.
Healer Specific Tips
-
Save healing cooldowns for when the boss casts Judgment: Reckoning at the end of Seal of Reckoning.
-
Prepare to deal with higher incoming damage if the boss has many stacks of Zealotry or when she is below 30% and has Avenging Wrath.
Champion of the Light Abilities & Strategy

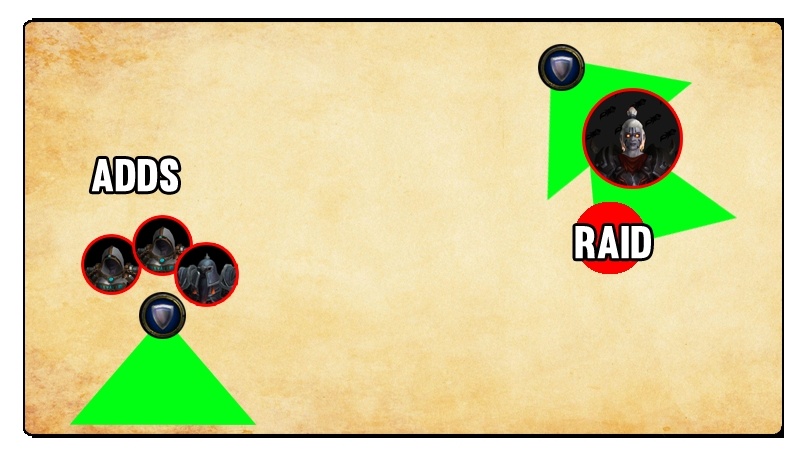
Keep the boss and adds separated
throughout the fight.
At the beginning of the encounter, the raid will face up against the boss and three adds: one Darkforged Crusader and two Anointed Disciples.
-
The adds and the boss should be kept roughly 30 yards apart throughout the encounter, due to the powerful Crusader's Seals the bosses have active at all times.
The boss will cycle between two different Crusader's Seals throughout the encounter, switching between them every ~50 seconds.
-
The raid must be prepared to switch between attacking the boss and the adds depending on what seal is active, as otherwise the boss will gain stacks of Zealotry.
-
Zealotry gives the boss a permanent 2% holy damage dealt increase which can stack very quickly.
-
If the boss gains too many stacks, the raid will struggle to survive the bosses heavy holy damage spells, likely resulting in a wipe.
Seal of Retribution
-
The boss always starts the encounter with the Seal of Retribution active, which causes her to occasionally deal a low burst of holy damage to the raid when she melee hits via Retribution Wave.
-
This seal will also buff all of the adds damage and healing done by 15% via the
 Aura of Retribution.
 -
Any adds that die whilst Seal of Retribution is active will grant the boss 20 stacks of Zealotry. Because of this, the raid must avoid killing the adds during this phase at all times.
-
The adds should be tanked away from the boss during this phase to ensure that they adds will not be killed off during the phase via passive AoE or cleave damage.
When the boss reaches 100% energy, she will cast ![]() Judgment: Righteousness, buffing a random adds damage by 200% and healing by 150%, before switching to the
Judgment: Righteousness, buffing a random adds damage by 200% and healing by 150%, before switching to the ![]() Seal of Reckoning.
Seal of Reckoning.
Seal of Reckoning
-
The Seal of Reckoning causes the boss to gain stacks of Zealotry each time she is attacked by a player. This includes fresh applications of debuffs, as well as AoE/cleave attacks.
-
The player currently tanking the boss will not give the boss stacks of Zealotry with their attacks, as long as they are afflicted with the Sacred Blade tank debuff.
-
The boss will also be dealing moderate bursts of holy damage to randomly selected players with her
 Reckoning spell.
 -
This damage cannot be avoided and must simply be out-healed.
As the boss will no longer gain stacks of ![]() Zealotry when adds die, the raid should focus all of its efforts into defeating the three enemies.
Zealotry when adds die, the raid should focus all of its efforts into defeating the three enemies.
-
The add afflicted with
 Judgment: Righteousness should be focused down first, as it is the most dangerous of the three due to the powerful buff it has.
 -
The boss and adds should continue to be tanked away from one another during this phase, as to ensure no Zealotry stacks are gained by the boss via accidental AoE/cleave.
-
All three adds should be defeated before the boss reaches 100% energy and switches back to the Seal of Retribution.
-
If add damage is high, this may mean that the raid will need to sit idle and wait for the boss to switch back.
-
Although this can be slow and painful, it is important to do as the extra damage you deal will not be worth the extra damage the boss will gain via her Zealotry stacks.
-
This is a great time to have one or two healing cooldowns to help the raid survive the incoming damage.
-
This ability is the primary reason why Zealotry stacks must be kept to a minimum throughout the fight, as the damage from this spell could be increased so much that it begins to one-shot people.
-
Once the ability has ended, the boss will summon a new set of adds via
 Call to Arms and the fight will then repeat - with the boss cycling between the two Crusader's Seals until she is defeated.
 -
The tank add should quickly gain threat on these new adds and stack them up in the same position as they have done for the rest of the encounter.
Wave of Light
The positioning of the adds and the boss relative to the raid is an important aspect of the encounter due to the bosses ![]() Wave of Light ability.
Wave of Light ability.

On a timer the boss will cast ![]() Wave of Light, sending out a slow moving yellow wave directed towards the position of a randomly selected add.
Wave of Light, sending out a slow moving yellow wave directed towards the position of a randomly selected add.
-
If no adds are alive when this ability is cast, a players location will be chosen instead (with the current tank of the boss being the most likely choice).
-
The wave will deal a moderate burst of holy damage and apply a 7 second magic dot to all players it passes through.
-
The wave will also place a magic buff on any adds it touches, healing them for 5% of their maximum health every second for 7 seconds.
-
Both the players damage over time debuff and the adds
 Heal over time buff can be dispelled/purged.
 -
This ability is cast during both Crusader's Seals phases.
The tank responsible for the boss should keep her still as much as possible, whilst the add tank minimizes the amount they move the adds around.
-
This is to keep the direction the Wave of Light travels consistent and predictable, allowing the raid to ensure they always dodge this ability by standing out of the path between the two camps.
-
Although it would be ideal if the adds can be moved to avoid each Wave of Light, this is difficult and unlikely as the adds remain still whilst casting the majority of their abilities.
-
Instead, purges should be used on the adds to remove the Heal over time buff during periods when the adds are being focused down by the DPS (such as during the Seal of Reckoning).
-
Purging the adds during the Seal of Retribution is far less important, as it is likely they will Heal to full multiple times due to the several healing casts from the Disciples.
Sacred Blade
With each melee hit, the boss applies ![]() Sacred Blade to the target. This 10 second debuff deals holy damage every 2 seconds and this debuff can stack.
Sacred Blade to the target. This 10 second debuff deals holy damage every 2 seconds and this debuff can stack.
-
This stacks up relatively slowly, doesn't do a large amount of damage.
![]() Sacred Blade can be reset in multiple ways, the two most useful of which are listed below.
Sacred Blade can be reset in multiple ways, the two most useful of which are listed below.
-
The debuff can be reset by having the add tank taunt the boss for 10 seconds before having the boss tank grab her back.
-
This should not be done during the Seal of Reckoning, as the adds are being focused during this time and the boss will likely gain accidental Zealotry stacks.
-
-
The tank can wait for periods where the boss is casting her seals or Judgment spells and move away.
-
By the time the cast has ended and the boss has reached the tank once again, it is highly likely that the Sacred Blade stacks would have reset.
-
A combination of these techniques should be used by the tanks to keep the ![]() Sacred Blade stacks at reasonable levels throughout the fight, ideally below 15.
Sacred Blade stacks at reasonable levels throughout the fight, ideally below 15.
Avenging Wrath
When the boss reaches 30% health, she will gain the ![]() Avenging Wrath buff, increasing her damage by 30% for the rest of the encounter.
Avenging Wrath buff, increasing her damage by 30% for the rest of the encounter.
-
The raid must be ready to deal with this increased incoming damage by saving some of the larger healing and damage reduction cooldowns for the later stages of the encounter.
Forces of the Crusade Adds
The adds that are engaged at the beginning of the fight, and spawn at the beginning of each new ![]() Seal of Retribution phase, should be tanked by a single player.
Seal of Retribution phase, should be tanked by a single player.
-
The adds are susceptible to all forms of crowd control aside from long duration roots and hard CC (such as polymorph/paralysis).
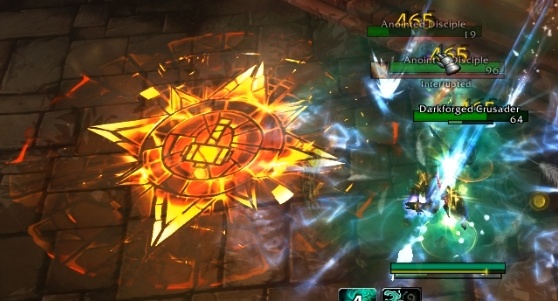
Anointed Disciples are spell-casters that always appear in pairs. They have three different interruptible abilities.
-
 Divine Burst deals a moderate burst of holy damage to a random player. This should be interrupted as the lowest priority.
 -
 Penance is a channel which either deals damage to a random player, or heals a random add, over its 5 second duration. This should be interrupted as a medium priority.
Although these abilities are powerful, it is unlikely that your raid will be able to cover all casts throughout the encounter.
-
Instead, the raid should only focus on interrupting these adds when they are being attacked by the raid during the Seal of Reckoning.
-
This will mean that the adds are likely to have a high amount of health going into the Seal of Reckoning phase, but the DPS should still be able to focus them down in time.
-
If you are struggling to kill off the adds during the Seal of Reckoning phase, the DPS should swap to them in the later stages of the Seal of Retribution to gain a head start.
Darkforged Crusaders are paladin-like enemies that have casts which effect the raid in a major way.
-
Aside from dealing a moderate burst of damage to the tank with
 Crusader Strike every now and then, the add will cast Blinding Faith.
 -
At the end of the cast, Blinding Faith will disorient all players facing the crusader for 5 seconds.
-
All players must turn their back on the crusader before the cast ends to ensure they are not caught out by this effect.
-
If the raid positions as suggested in the image to the (left/right?) during the Seal of Retribution, the mechanic can be largely countered automatically with the raid already facing away.
-
It is mostly during the Seal of Reckoning, where the raid is mainly focused on the adds, where the Blinding Faith needs to be actively countered.
The crusaders will also frequently cast ![]() Consecration, leaving a zone on the ground which deals damage to players who stand within it whilst reducing the damage the adds take within it by 50%.
Consecration, leaving a zone on the ground which deals damage to players who stand within it whilst reducing the damage the adds take within it by 50%.
-
During the Seal of Retribution phase, these can be stacked on top of one another, as the adds do not need to receive meaningful damage during this phase.
-
During the Seal of Reckoning phase, the adds should be dragged out of these zones as much as possible as to allow DPS to deal full damage to them.
-
Moving the adds can be difficult, mainly as they cast spells so frequently, however displacement and silence effects can be very useful at getting them out of the zones.
Alternative Burst Strategy
Guilds with excellent single target damage may wish to tunnel all of their damage into the boss throughout the fight, ignoring the adds entirely (aside from the tank who still keeps them away).
-
This will mean that the boss will gain excessive Zealotry stacks during the Seal of Reckoning phase, substantially increasing her holy damage output.
-
This is most problematic when the Judgment: Reckoning ability is cast at the end of the Seal of Reckoning phase.
-
If the entire raid stacks up and uses defensive/healing cooldowns for this hit, it may very well be possible for the raid to survive.
-
This strategy would require the raid to defeat the boss before the Judgment: Reckoning ability is cast too many times, as they will eventually run out of cooldowns to counter it.
-
It is unlikely that this strategy will be viable in the first few weeks of the Battle of Dazar'alor raid, but it may very well be an easier strategy to use when reclearing the instance later on in the tier.
Heroic Difficulty
Aside from numerical changes, in which the abilities deal more damage and the enemies have more health, there is one mechanical addition to the encounter on heroic mode.
The boss will occasionally buff a randomly chosen add with ![]() Divine Protection, reducing all damage they take by 99% for 6 seconds.
Divine Protection, reducing all damage they take by 99% for 6 seconds.
-
This effect cannot be placed on the same add more than once every 30 seconds, as the ability also grants
 Forbearance.
 -
As of latest testing, it was not possible to remove this buff via Offensive Magic purges and Mass Dispel.
The ![]() Divine Protection cast is more irritating than anything else, as it slows down the damage you deal to the add over those 6 seconds.
Divine Protection cast is more irritating than anything else, as it slows down the damage you deal to the add over those 6 seconds.
-
Aside from this, the recommended strategy for the encounter remains the same.
Mythic Difficulty
Aside from numerical changes, in which the abilities deal more damage and the enemies have more health, there is one addition to the encounter on Mythic mode.
Throughout the fight, the boss will occasionally cast ![]() Prayer for the Fallen.
Prayer for the Fallen.
-
This will cause all adds, alive or dead, to stop all of their actions and begin to cast a powerful ability.
Crusaders will channel ![]() Divine Mallet for 8 seconds, which sends out spirals of hammers that travel across the encounter space.
Divine Mallet for 8 seconds, which sends out spirals of hammers that travel across the encounter space.
-
Any player hit by these hammers will take a significant amount of holy damage. This should be avoided at all costs.
-
Dodging the hammers is easier the further away you are from them, as you have more time to assess their movement and adjust your position accordingly.
-
The add tank should attempt to keep the Crusaders at the other end of the encounter space to achieve this.
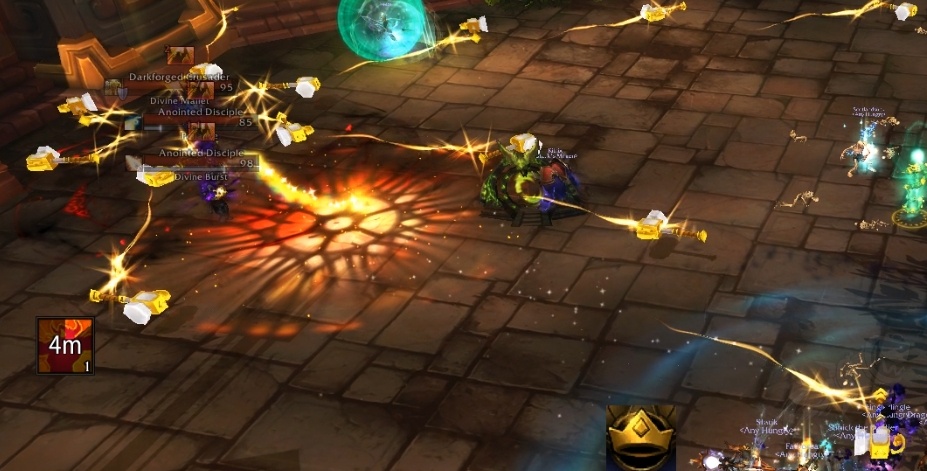
Avoid the hammers that spiral across the encounter space!
Disciples will cast ![]() Angelic Renewal. This interruptible cast will
Angelic Renewal. This interruptible cast will ![]() Heal the boss back to full health.
Heal the boss back to full health.
-
If one of these casts goes through, it is likely a wipe.
-
The raid must assign one player per disciple to interrupt the cast as soon as possible.
Adds that have died will always reanimate in the exact same position when the Prayer of the Fallen is cast, before dying once again after their ability is complete or interrupted.
-
Players assigned to interrupt specific disciples need to keep track of where their assigned add died, so that they can make sure they are within range of it when it respawns and starts to cast again.
-
This is likely to be done by having a player mark the alive adds with raid markers. When they die, that player can then mark the location on the ground with the same raid world marker colour.
-
-
The tank should attempt to have the crusaders die on a set spot. This spot can be also used to stack any alive crusaders.
-
This ensures that all hammers are originating from a single location, making them easier for the raid to dodge.
-